What A Calibration Certificate Should Contain

Is Your Calibration Cert Correct?
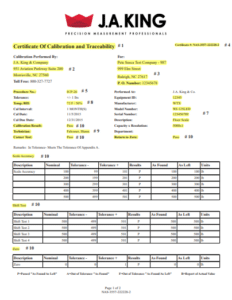
What A Calibration Certificate Should Contain 1A calibration certificate documents critical information about a piece of equipment and details surrounding its calibration. While a deliberate amount of flexibility is allowed depending on service level options and customer requirements, every calibration certificate should contain some key elements.

  1. A title (ex. Certificate of Calibration and Traceability)
  2. Name and address of the laboratory where the calibrations were carried out
  3. Name and address of the customer
  4. Unique identification of the calibration certificate
  5. Identification of the calibration procedure used
  6. List of standards used to perform the calibration including their calibration dates and traceability
  7. Unambiguous identification of the item calibrated
  8. The environmental conditions under which the calibrations were made that have an influence on the measurement results
  9. Name, function, and identification of individual authorizing the calibration certificate (technician)
  10. Calibration results with the unit of measurement

For a detailed look at these elements on a certificate, click on the image of our sample calibration certificate or the following link: Level 3 Certificate Example

Our precision measurement experts will work with you to ensure that your calibrations along with the accompanying documentation meet all the requirements of your quality system. In addition, our award winning calibration tracking software GageSuite™ is free to our customers, and ensures your calibration certificates are electronically available for you 24/7. Contact us today to discuss your documentation requirements and see how Cross can help!


How Can Cross Help?

In the field of metrology, there are many standards to follow to ensure reliable calibration or inspection. At Cross Precision Measurement, we are an ISO 17025 accredited calibration laboratory that adheres to standards set out by NIST (HB44), the National Conference on Weights and Measures (NCWM), the National Type Evaluation Program (NTEP), A2LA, and other relevant standards. With our experience and expertise, we can ensure you’re getting reliable, repeatable metrology results.

Since 1939, our Precision Measurement group has provided industry-leading technical expertise coupled with world-class customer service to manufacturing and other industrial operations in need of onsite calibration, product inspection, precision measurement equipment, and more. Our precision measurement and inspection teams have the knowledge and resources to help you reduce risk, improve quality, and increase efficiency throughout your entire process. With our extensive network of calibration labs across the Southeast and Midwest, we can ensure you’re getting the metrology services you need. Contact Cross Precision Measurement today

Latest Cross Company Resources

roanoke va
Our customer is a specialized manufacturer of machinery for processing metal coils and grinding rolls based in Roanoke, Va. They needed to integrate a new inspection station into their existing production line. The challenges were to design a system that could accommodate their existing gantry, all while holding and inspecting
September 17, 2025
Cross Logo
An automotive manufacturer requiring a high level of alignment in their ring gears requested an easy to use 360 degree measuring tool that could quickly determine the total runout along the circumference of the gear. Prior to using the solution from Cross the part was manually rotated on a stand
September 11, 2025
Cross Logo
A munitions manufacturer wanted to improve their finished goods product packaging, ensuring the correct count of bullets were being packaged into their bulk boxes. Prior to adopting a small parts counting control system from Cross they manually counted bullets into the boxes, and to verify the counts were correct they
September 11, 2025
Cross Logo
A water treatment chemical manufacturer needing to blend high concentrate sulfuric acid into multiple blending stations requested a solution to measure and batch the acid introduced into the mixture. Holding the acid supply in a nearby isolated environment required a system to safely transport and batch the acid to the
September 11, 2025
Cross Logo
A small engine appliances manufacturer requested a solution to calibrate their engine safety testing system. The particular testing system utilizes a dynamometer, laser tachometer and timer all connected in a PLC to determine the time needed for a lawnmower blade to come to a complete stop after the emergency switch
September 11, 2025
Cross Logo
Founded in 1977, Tailored Chemical Products is a leading mid-sized manufacturer of adhesives based in Hickory, North Carolina. They specialize in manufacturing a full line of hot melts, water-based glues, emulsion polymers, mastics, urea and synthetic resins and other specialty chemicals for any industrial application.
September 11, 2025
Cross Logo

See how our team can help improve efficiency, reduce risk, and raise quality in your process.

Contact our Team

Hang Tight! We're Searching... Searching... Searching...

We’re looking through thousands of pages to find the most relevant information.

In the meantime, enjoy these fun facts…

Did you know… Cross Company is an ESOP (Employee Stock Ownership Plan). Our ESOP started in 1979 and as of 2006, we are 100% employee-owned! Learn more about our ESOP and how that benefits both team members and our customers.
Did you know... the precision measurement group at Cross was founded in 1939 by our current CEO's grandfather, Jim King. That's a whole lot of calibration!
Did you know... A fingerprint weighs about 50 micrograms. We know, we weighed it! The residue left from a finger can actually make a difference in weight results which is why we wear gloves when we calibrate weights. For reference, a sheet of paper is about 4.5 grams, that’s 4.5 million micrograms.
Did you know… Cross Company has grown significantly since our start in 1954. Over the years we've acquired 26 companies! Today, our five groups have expertise in everything from industrial automation to precision measurement, and industry knowledge going all the way back to 1939.