Meinecke’s WP/Dynamic Series Flow Meters consist of just three replaceable parts… The Body, The Internal Measuring Unit (IMU) and the Non-Resettable Totalizing Register.
Meinecke Meter WP/Dynamic Series bodies don’t need replacement very often, but are susceptible to failure in rare circumstances. The Internal Measuring Unit, also known as an IMU, includes all of the working parts of a WP/Dynamic Turbine Meter in one factory calibrated, modular unit. The final field replaceable part is the totalizing Register.
Register Replacement…
The register is the only individual part that can be quickly and easily replaced in the field. The following instructions apply to the Sensus/Meinecke WP/Dynamic Series meters only.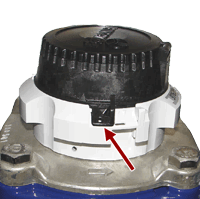
Step 1: If still attached to your flow meter, clip the copper wire/seal that limits the rotation of the black register cover on the meter’s grey cowling as shown to the right.
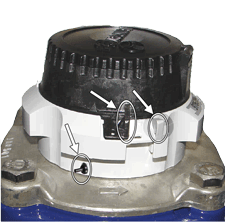
Next, locate the small black split rivet on the side of the grey cowling. If you look at the center of the rivet very closely, you will see a small pin inserted into it. That pin effectively expands the split end of the rivet, locking it in place.
 Using a large paperclip, push the pin into the center of the grey cowling. It will drop into an easily accessible area where you must retrieve it later.
With the center pin removed, pull the plastic split rivet out and put it in a safe place for later use. Do not lose the rivet or the center pin!
With the seal wire clipped and the rivet removed, anchor the grey cowling with one hand and twist the black upper section slightly clockwise with your other hand. It will turn about 3/4 of an inch. At this point you can separate the register assembly (black cover, lid and register) from the grey cowling below.
The flow meter will look like this with the register assembly removed. Note the location of the Rivet Pin as shown. It may not be in this exact spot, but it will be close by. 
Find the pin and put it, along with the split rivet in a safe place. As mentioned, you’ll need both to re-assemble the meter later on.
With the register assembly removed and the split rivet/center pin tucked away in a safe place, your next step is to disassemble the register assembly.
This assembly will separate into three pieces… The Top Half, the Lower Half and the register itself. First, get a good grip on the bottom side of the lower half and separate it from the top by pulling them apart. Plastic Tabs on the lower portion of the top section hold the register and lower section in place. In some instances, you may need to gently force those tabs outward to a point where they release the lower section. It’s ok to push down on the glass register cover if needed to force the register down and out. 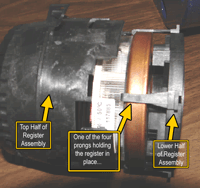
With the top half separated from the bottom, the final step is to separate the old register from the lower half by gently prying one or more of the pronged holders back just enough to release the register. Disassembly is complete!
Step 2, Assembly: With the removal of the old register, you are now ready to install the new one! Prior to installation, take a moment to inspect the new register for any damage. In particular, take a close look at the cone shaped center protrusion on the back side of the register to be sure it’s not damaged or leaning in any particular direction. This cone shaped protrusion houses the magnetic sensor and is critical to the accuracy of your meter.
On the back side of the register, there are three small bumps… 2 on top and 1 on the bottom. There are matching dimples on the four pronged holder that the register is installed in. 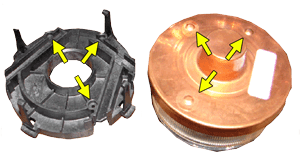
Match them up carefully and insert the new register so that all three protrusions are inserted into the matching dimples on the holder.
 With the register correctly installed in the holder, insert the complete lower section into the upper section. For proper alignment, locate the small bubble at the top of the register. It needs to be lined up with the center of the lid hinge as you put the two halves back together again.
Once the entire register assembly has been re-assembled, insertit into the grey cowling on the meter. Be sure to align the black tab on the register to the grey tab on the mounting ring. Once there, turn the black portion clockwise to bring the two tabs together.
 Insert the rivet back into the hole and then slide the rivet pin back into the center of the rivet. Push it in until flush with the rivet. Secure the black tab to the grey cowling with a short length of copper or SS wire.
Congratulations! You’re Done.