Small Radius Measurement Error
Measurement of small radius and radius with short arc length or included angle present a challenge to metrologist regardless of the device used to gather data points. The following data illustrates the effects of form error and/or measurement error and reduction of arc length.

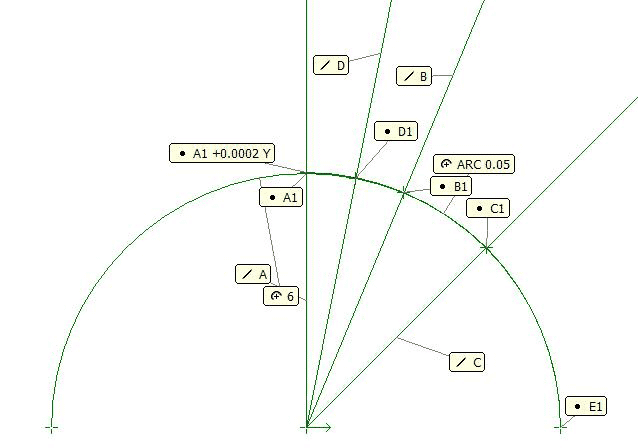
1. Points A1 (X0,Y0.5), B1 (X0.01913,Y0.04619) and C1 (0.03536,Y0.03536) are used to create a 0.0500 radius with a 45 degree included angle (Line A – Line C).
2. Point A1 was moved +0.0002” in the Y axis. Points A1 +0.0002”, B1 and C1 were used to calculate an arc. The results are 0.05135. Moving A1 0.0002” resulted in achange of 0.00135” in the Arc as well as a centerline shift of X -0.00076” and Y -0.00114”.
3. Points A1, D1 (X0.00975,Y0.04904) and B1 are used to create a 0.0500 radius with a 22.5 Degree included angle (Line A – Line B).
4. Point A1 was moved +0.0002” in the Y axis. Points A1 +0.0002”, D1 and B1 were used to calculate an arc. The results are 0.05580. Moving A1 0.0002” resulted in a change of 0.00580” in the Arc as well as a centerline shift of X -0.00169” and Y -0.00557”.
5. To further illustrate the effect of maximizing included angle of the arc segment, a 90degree arc with the same A1 +0.0002 results in a 0.00034” deviation from 0.0500. (A1+0.0002, C1 and E1 (X0.05, Y 0.000).
6. Point B1 was moved +0.0002” in the Y axis. Points A1, B1 +0.0002 and C1 were used to calculate an arc. The results are 0.04786. Moving B1 0.0002” resulted in a change of -0.00214” in the Arc as well as a centerline shift of X 0.00089” and Y 0.00214”.
7. It is worthy to note that a positive movement of B1 +0.0002 resulted in a smaller radius and a positive centerline shift.
Consideration should be given to not defining small or short arc segment radii as a size and position or direct tolerance. Applying a profile tolerance in lieu of a size and position, will usually ensure functionality while allowing for reliable measurements.

