Temperature Control with Ramping and PID Tuning
We are often tasked to control a temperature that must ramp up as rapidly as possible to a target setpoint, minimize any overshoot, and control steadily at that setpoint once achieving it. This application heats acid when the machine is not in production. When the machine is running production, other heat sources cause the temperature to rise above the 78°C heat target without this PID’s heating. That requires active cooling to maintain a 80°C target while running (not part of this discussion). I have logic to switch to cooling when PV>80°C, then back to heating when PV<78°C.
There are many ways to achieve that ramp transitioning to steady state control … this document details one method I just implemented and tuned. This method triggers a rapid heat-up when the heat is enabled and the actual temperature “PV” >4°C below the target setpoint “TargSP”. That forces the PID CV (“controlled variable” = output) to maximum until PV > (TargSP – 2°C). Once the rapid heat-up ends, the PID is then held at 0% for a moment to help stop the increase, then held at the previously captured CV it had been running when last “in control”, and that is held for up to 5 minutes, or until PV>TargSP, after which the PID is released to auto.
Some Details And Specifics:
- All the numbers here are tunable variables, not hard-coded constants. I’m writing them as constants for clarity.
- The basic PID is tuned for steady state performance. In this case P=10, I=10 minutes/reset, D=0.3.
- Before tuning, it’s helpful to observe how the CV affects the PV in manual. Critically in this case, I needed to know that it takes about 3.5 minutes from the time the CV went from 0% to 100% before we saw the PV start to rise. That long time drives the other long times in this method. If your response time is faster, many of the times I use in this document can also be proportionally shortened, and the PID can handle more integral action (10 minutes per reset is VERY low).
- It is possible to reduce overshoot by using a large proportional. However, this will cause oscillations when in steady state. It’s better to tune the proportional to the optimal value for steady state and use other means to limit overshoot. Other schemes might switch out different sets of tuning parameter values for ramping vs steady state – I’m not doing that here, but that is a viable option for situations where you want a controlled ramp up instead of this “as fast as physically possible” ramp up.
- In this case I manually set the 2°C below target setpoint to end the max pre-heat by observing the performance. In other situations, particularly when a wide variety of targets might be used, I add logic to automatically capture how much overshoot there was and adjust that parameter to target an optimal overshoot.
- A small overshoot IS optimal with this method. You want to release the PID to auto as the PV passes the target SP so the CV transition is smooth. This is especially true when (as in this case) you are using a ramp function to track a ramping setpoint to PV when not auto. That ramp function together with failing to overshoot was why the first attempt had the CV blip down when it released to auto. Not a big deal, but avoidable.
- “In Control” is when the PID is in auto, |Error| < 0.5°C, CV>10%, CV<95% for 10 minutes.
- Captured CV is a filter with time constant of 1 minute with CV as the input, and set to only update when “in control”, and SP>45°C. When the logic sets the CV to that captured CV, it actually increases it by 20% to ensure a slight overshoot. Also because when you’re coming up with a cold machine it usually takes a higher CV initially, gradually settling to a slightly lower CV after it’s all heated up. I set that 20% value manually.
- Various regimes need to be tuned and checked: maximum ramp, steady state, response to upsets, response to small SP changes. The last two are generally similar enough that doing one is a good proxy for the other.
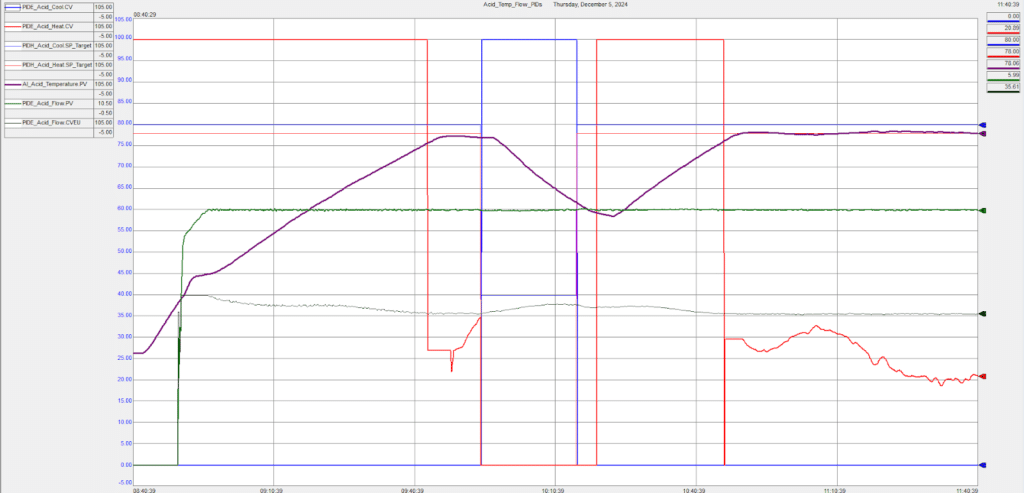
Three Hour Trend Showing Heat-Up From A Cold Bath
Here is a 3-hour trend showing heat-up from a cold bath. You can see the first attempt came up about 0.6°C short of target at 09:50. I put it back into idle to force-cool it back to 60°C, made some adjustments, then ran the cold start logic again. The second attempt was perfect – a 0.3°C overshoot (a small overshoot between 0-1°C is desirable) and smooth release to stable auto control, staying within 0.5°C of setpoint going forward.
Also note the pump speed to maintain acid flow SP at various temperatures is a good proxy of viscosity vs temperature. It’s a significant factor…
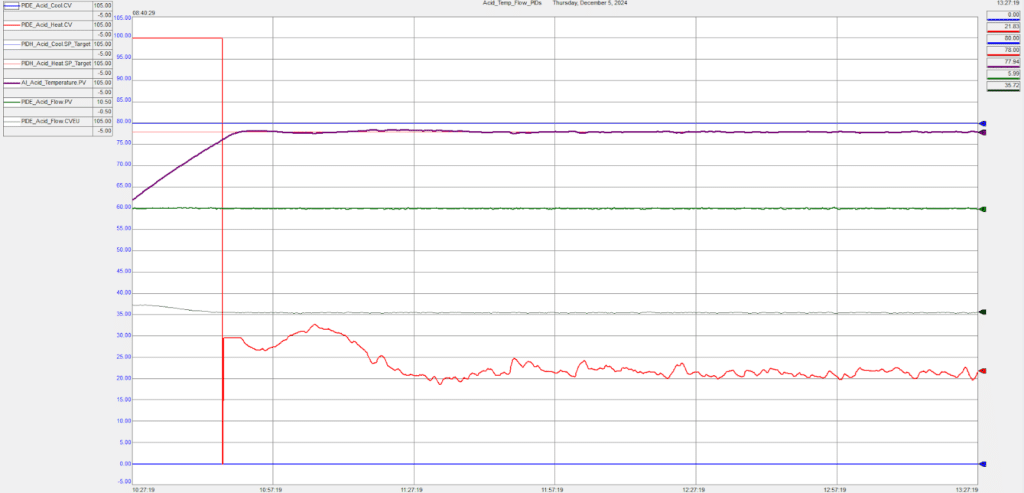
Two Hours Later…
Here is the same trend two hours later, showing good steady-state tuning performance. PV was within 0.5°C the whole time after the ramp ended.
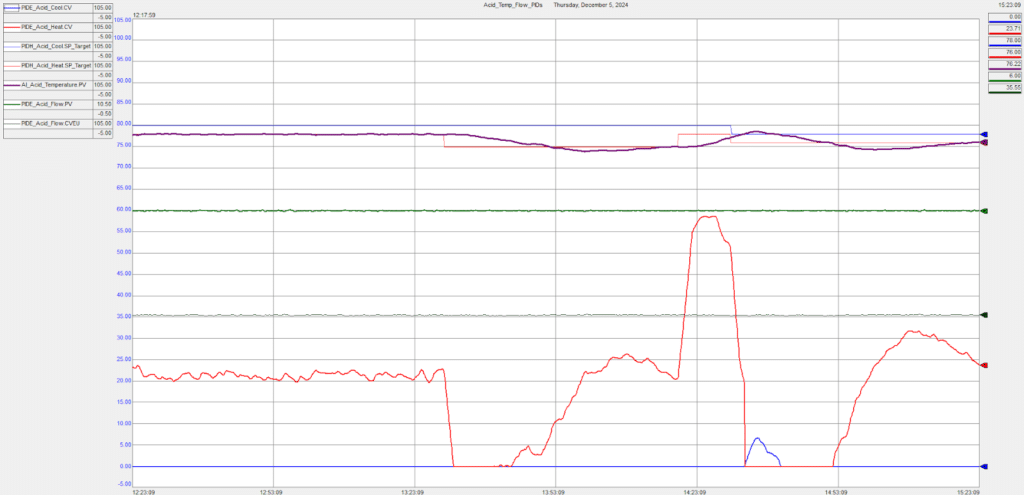
Testing The Response To Small Setpoint Changes
Here is the same trend later, I was testing the response to small setpoint changes. I had originally planned to drop the heat SP from 78°C to 75°C, wait for it to stabilize, then put it back to 78°C. But 10 minutes after that last change (before it had a chance to reach the new SP, much less stabilize), I had a conversation with the process owner about temperature setpoints. After explaining the 2°C gap between heat and cool target SPs, we determined that the cooling SP should be 78°C and therefore the heating SP would be 76°C – that resulted in the last change and the blip of cooling at 14:35.
This is one method to achieve a rapid ramp with minimal overshoot, then good steady-state control at the target. Configuring the system to automatically capture steady state CV and adjust pre-cutoff offsets can reduce the need for manual tuning going forward.
For mote informaton about tuning a PID loop, take a look at our reated articles:
Work With An Expert
If you are experiencing issues with tuning your PID loop we encourage you to reach out to one of our process solutions experts. While this guide is intended to help you tune your PID loop and troubleshoot common issues, this is not an exhaustive list. Please contact us today to discuss your application and specific issues you may be having with your PID loop.