John Loose | April 8th, 2016
This blog is intended to help guide you through the configuration of the latest Modbus/TCP to Profinet Library for PCS7 V8.1 SP1 as of the release date of this blog.There will be many references to the manual that come with the Library, but I will include things that they do not mention and steps I took to configure my system.
Note: Before beginning the user should be aware that in order to establish communication with a new Modbus device, there will be several downloads to the CPU that will place it in Stop Mode. The system should be in a safe state through the duration of the download.
Installing Modbus Library
A CD should have come with the Simatic Modbus/TCP to Profinet Communication Library. The CD will contain a manual that will be referenced throughout this blog.
- The first thing to do is to navigate to the CD via Windows Explorer on your Engineering Station (ES) and run the Setup.exe. This will install the appropriate Library but it will not be included into your projects Master Data Library (MDL).
- Once the Library is installed and you open your project in Simatic Manager you will open the library by going to File->Open->Libraries. If the library is not listed then browse to C:\Program Files\Siemens\Step7\S7Libs.
- After the Library is open you will copy the blocks from the Library to your projects MDL blocks folder. In my case, I had multiple Automation Stations (AS) but was only utilizing the Modbus Library in one. So I copied the blocks from the MDL to the appropriate AS blocks folder.
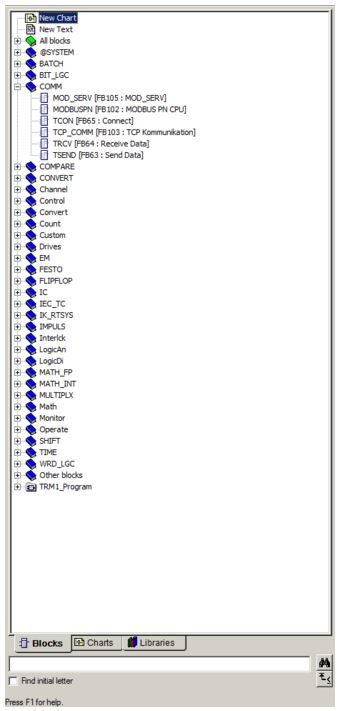
List of Function Blocks:
- MODBUSPN (FB102)
- TCP_COMM (FB103)
- MOD_CLI (FB104)
- MOD_SERV (FB105)
- MODBUS_PARAM (DB2)
- License DB (DB3)
Note: When copying these blocks from the Library to the MDL, it might be necessary to change the FB# to avoid duplication. Verify that these FB#’s do not exist before copying. [Reference Manual p.3-4]
Standard Library Function Blocks
In order for communication to function properly there are several blocks from the Standard Library that need to be present. Refer to the list below.
List of Standard Library Function Blocks:
- TSEND (FB63)
- TRCV (FB64)
- TCON (FB65)
- TDISCON (FB66)
Note: These T blocks are called internally after parameterization and need to be of the correct version.
- Once all of the blocks have been added to the project, perform a Compile and Download with “Changes Only”.
Configure Modbus Communication
The way that this communication is performed compared to previous version can be daunting, but Siemens has a Wizard that does the majority of the configuration for you. The Wizard can be found Support.Industry.Siemens.Com. The Wizard will configure the MODBUS_PARAM Data Block. The following information will be required for the Wizard.
Note: The parameters are something that you have to play with to get communication working correctly. If you have trouble getting connected to the Modbus device after your block is registered, the first thing I would try is to switch the Server Client assignments.
Wizard Information:
- Connection Parameters
- Modbus Parameters
- Which device is the Server and Client
- Number of connections
Note: There were a couple times that the parameters did not take when I used the wizard, so I would suggest opening the MODBUS_PARAM Data Block and verifying that all of parameters are there. [Refer to the manual p.4-3 for a list of descriptions of parameters]
Obtaining Registration Key from Siemens
This should be an easy process, but I found it to be cumbersome and inconvenient. However, it must be performed to establish communication. The MODBUSPN block has to be registered to each CPU separately. After you ran the Setup.exe in the beginning section, a registration form was also installed. This form will have to be filled out with the CPU Identity code and the License # of the Modbus/TCP Library. The form is located at C:\ProgramFiles\Siemens\Step7\S7Libs\Modbus_PN_CPU.
The License # can be found on the front of the box. The CPU Identity code can be found in the MODBUSPN Instance Data block when online. Write both of these number on the form and send it to Siemens.
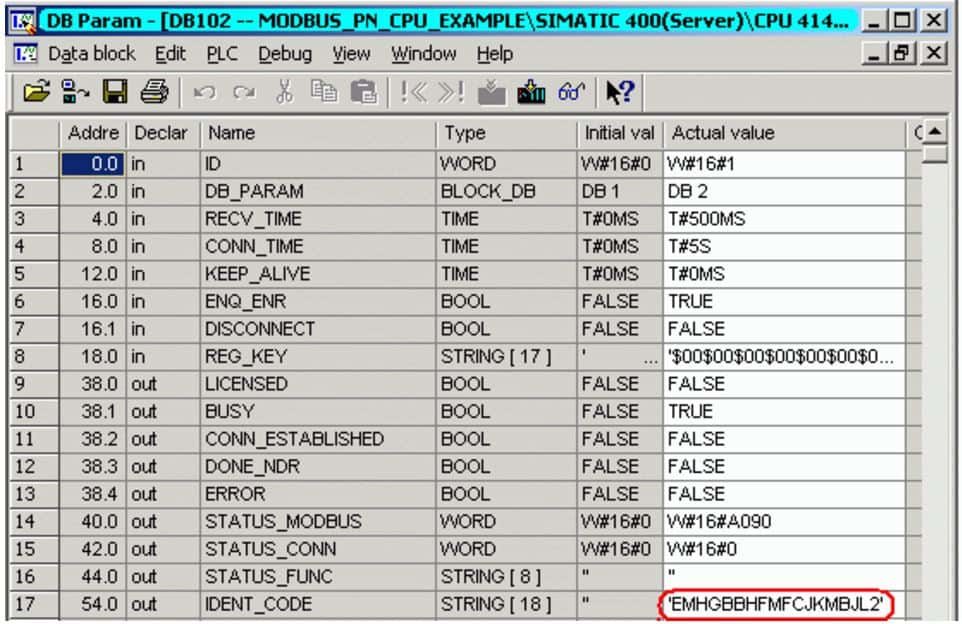
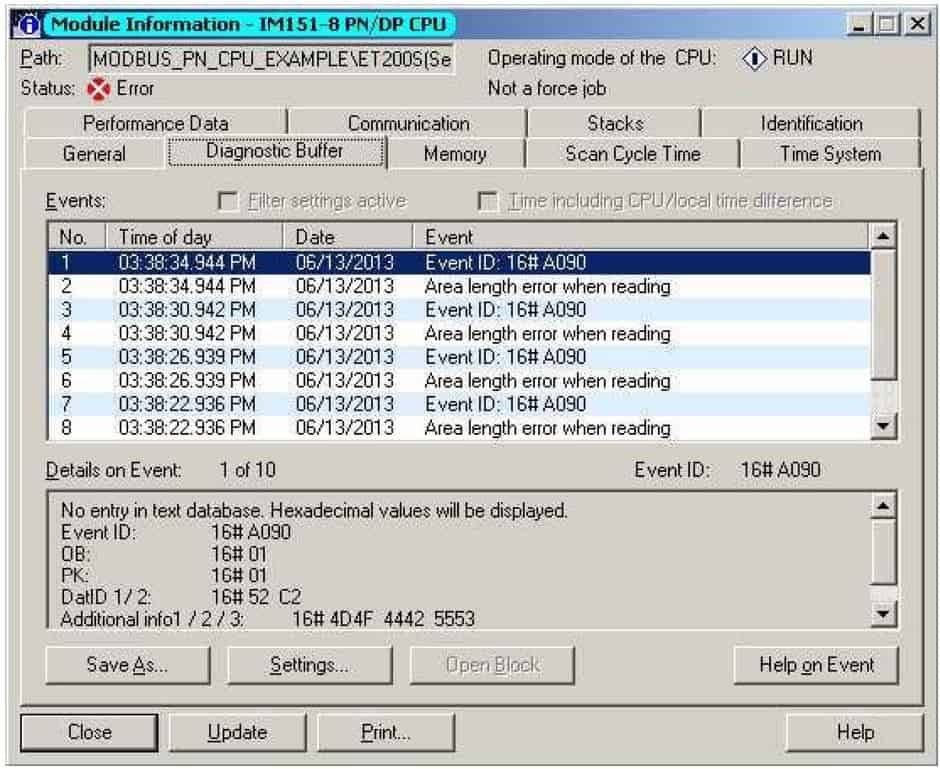
Until you receive the Registration Key back from Siemens your block will have an error (16#A090) and will not communicate.
Note: The form instructs you to send this information to the email address provided. In my experience that did not work, so I ended up opening a new support request. I had a much faster response this way. You can do this at Support.Industry.Siemens.com
After receiving the Registration Key open the License Data Block and enter it into the initial value column of the structure. The Data Block will have to be initialized again in order for the change to take place. This can be performed by changing to the Data View then going to Edit-> Initialize Data Block. To transfer the change to the PLC perform a Compile and Download with “Entire Program”.

Note: This will place the CPU in stop mode.
Configuring MODBUSPN Function Block
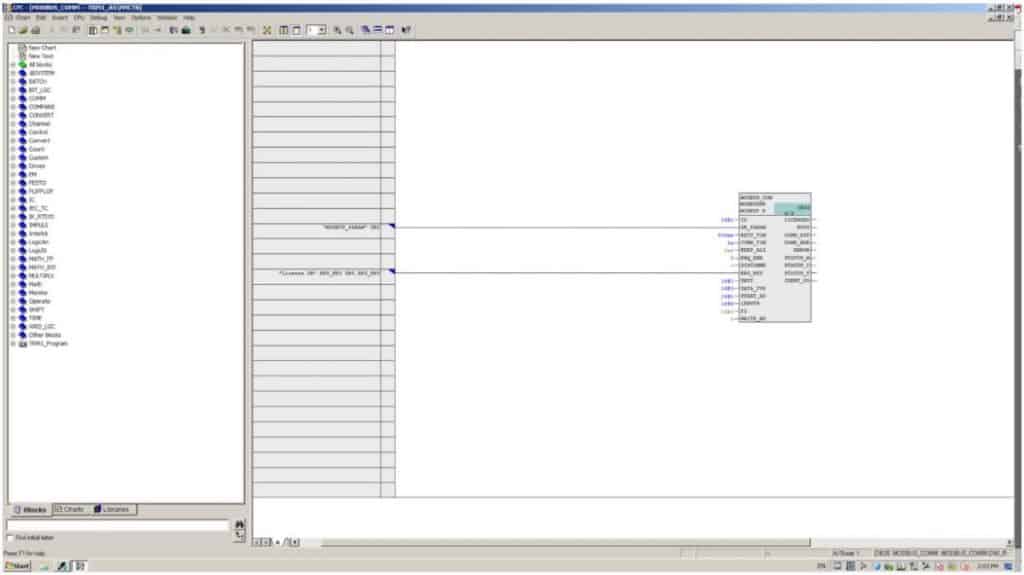
Create a new CFC in the desired hierarchy folder and locate the MODBUSPN block in the tree on the left side of the CFC Editor window.
Next, add an interconnection to DB_PARAM input block, this is connected to MODBUS_PARAM Data Block. Similarly, add an interconnection to REG_KEY from the License_DB. The block also needs a unique ID, in the event of multiple MODBUSPN blocks this ID# will have to be different but the REG_KEY and PARAM_DB inputs can be the same.
The configuration of the remaining inputs will depend on your specific application and what device you are communicating to. Refer to Manual p.6-5 for description of inputs and outputs of the block. Once configured, Compile and Download.
List of Modbus Data types:
- Coils – 16#1
- Inputs – 16#2
- Holding Register – 16#3
- Inputs Registers – 16#4
Things They Don’t Tell You
Word swapping, Byte Swapping, Word & Byte Swapping
If communication has been established and you can see data but the data does not correlate to what you see on the other end it could be caused by some sort of swapping. Some Modbus devices swap words, bytes, or even both. My device luckily only swapped words so I used the shift function block to move the bits 16 places. Keep this in mind while programming, although you may have to be more creative.
Configuring Your Modbus Device For Communication
Most Modbus devices are straight forward on their registers and configuration of communication. The device I had unfortunately was not so simple and did not follow a standard format and had to guess what registers the device was using to send the data. If you find yourself in this situation, I recommend using Modbus Doctor or any third party software that allows you to view all data in the registers being sent. I had to keep guessing registers until I found the ones with the data I was looking for in it. Once I found them it was a simple process to get them on the screen.
Connecting Your Laptop For Troubleshooting
Most of the work to be performed in this blog post is to be completed on the ES but when using Modbus Doctor I was on my laptop. Typically the ES of a PCS7 system is not connected to the Profinet Bus therefore it may be necessary to either jumper the Terminal Bus with the Profinet Bus (not recommended) if the work is required to be performed on the ES or use your laptop in the field and connect to the Profinet Bus directly. Make sure in either situation that you are on the same subnet.