Efficient Handling of Virtual Images
With the advent of powerful processors and large amounts of memory and hard drive space, VMWare has become a very useful tool for people working with automation software. Benefits include:
- Many different or conflicting software packages can be run on the same computer by installing them on separate virtual machines (VMs). This includes conflicting versions of the same software.
- Obsolete software can be run on obsolete operating systems (OSs) not compatible with a modern computer’s hardware.
- Improved efficiency by allowing many people to use a VM that one person spent a lot of time installing and configuring.
- Improved efficiency by making systems which took a long time to install and configure easily portable to replacement hardware.
Minimizing VM Image Size
The virtual images consume copious amounts of disk space and take a long time to transfer – especially over wide-area connections. The smallest, cleanest Windows XP-SP2 will consume at least 1.5 GigaBytes (GB) of space when powered down. A clean Windows 7 VM will consume almost 10 GB. How can we minimize the size of VMs for more efficient storage and transfer?
I recently attended a training session where they gave the students a VM with a simulator. This is an excellent use for a VM! But because the trainer did not follow any of the steps below, the image was 40 GB and took a really long time to copy from his portable drive. I applied these steps to his image without removing any functionality and reduced the size of the backup to 7 GB.
When making a backup of an image – especially for distribution:
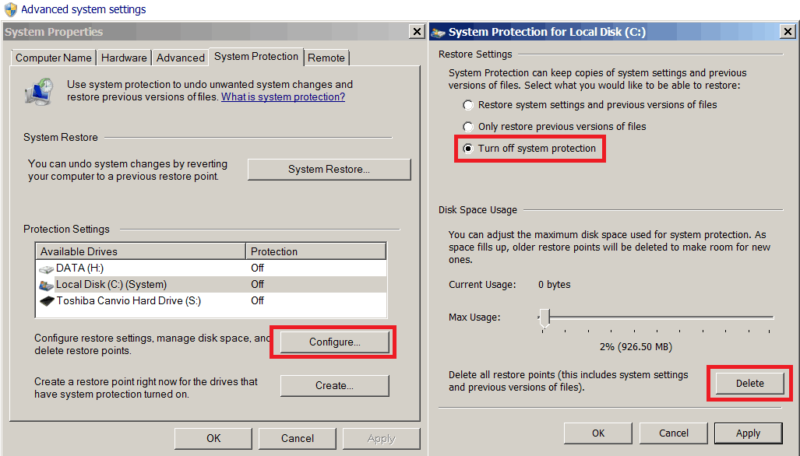
- Turn off system restore (XP) / system protection (Win7). Windows Server OS’s do not have this feature. If you want to go back to an earlier version of the VM, just restore a backup.

- Delete Windows Update uninstall packages. These are frequently found in the Windows directory – folders which start with $.
- Clean up all your temporary folders. These can be found on drive roots, Windows\Temp, and in the local settings folders for each user.
- Ideally, install software from locations not on your virtual machine. Use shared folders, external drives and/or link the VM’s CD/DVD to ISO images to do installations. If you do copy installation files onto the VM, delete them once they are no longer needed.
- If you want to capture the state of a VM before making a change you might want to undo, don’t take a snapshot. Rather, shut it down and back it up according to this procedure. If you take a snapshot, make sure you remove it before backing the VM up for distribution. Otherwise, you will DOUBLE the size!
- Do a disk cleanup. Check all the standard options other than compressing old files. Also go to the “More Options” tab and clean up system restore points and shadow copies. Windows Server OS’s do not have this feature – instead just delete files you know you don’t need and empty the recycle bin.
- Make sure you properly shut down the OS to power down the VM. Suspending the VM will leave large virtual memory files and various caches that will increase the backup size by several GB.
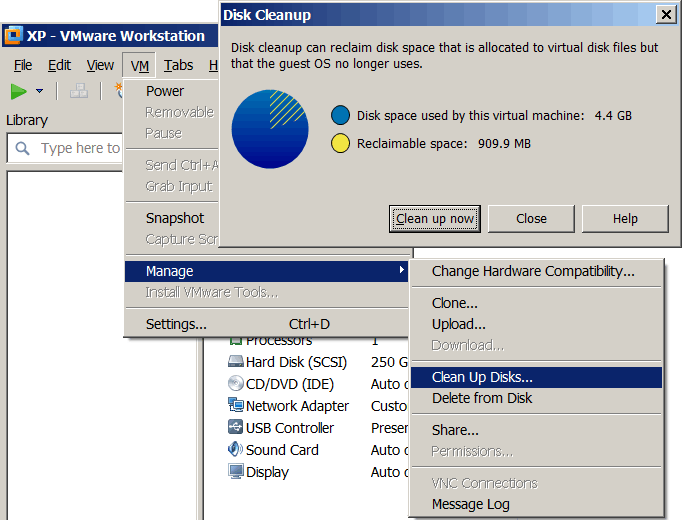
- Once the VM is shut down, perform a disk cleanup from the VM’s Manage menu. This will release unused space from the virtual drive files and significantly shrink them.
- Go to the folder containing the VM and zip the files there. Do NOT zip any of the sub-folders (the cache folder is unnecessary). Make sure each zip file is < 2GB. Around 1 GB is better. This will make the zip files compatible with all external storage, and also allow image transfers to be done in pieces – they can be interrupted without losing everything already transferred. Typically, I’ll sort the folder by size and put each of the large image files in a zip file by itself. Then when all the remaining files total < 3GB, I’ll put them all in one last zip file.
Other VMWare Tips and Information
When you transfer a VM to a new location, VMWare will ask if you moved or copied it on the first run from the new location. ALWAYS say “I moved it”. Saying “I copied it” will generate a new hard drive ID code, so that any licenses keyed to that ID will no longer work.
Making a New Image:
- Do you really need to make a new image? Fresh images may already be available for the OS you need. Use those existing ones when you can.
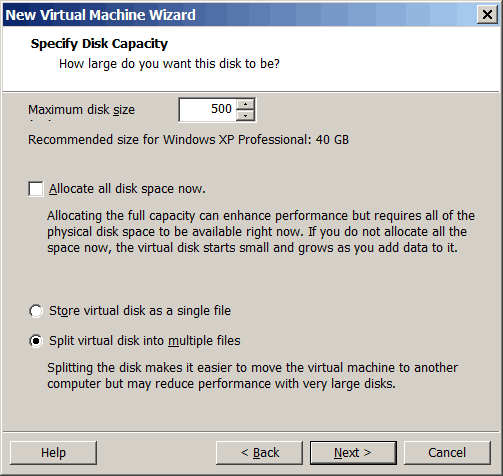
- Have the virtual image in multiple 2GB pieces, not one large file. Some external devices and OSs cannot handle files larger than 4GB. Also it’s better to have multiple small files so that uploads and downloads can be done in pieces.
- Do not pre-allocate space for the virtual drive.
- Go ahead and make a huge virtual hard drive. A Terabyte is no problem. If you change the size of the hard drive later, it resets the ID code which kills any licenses that may have been applied including Windows. Each empty 2GB image file is only 328KB, and the blanks zip to 600 bytes so there’s almost zero storage cost to have a huge, mostly empty drive.
- The number of processors, cores and amount of memory can be changed later without ill effects.
- When you finish creating the new image, and BEFORE you install any other software on it, back it up (see above). This will save time creating new images later on.
Networking
The basic VM network bridge picks a connected network adapter more or less at random. If you have a computer with multiple network adapters (like a laptop on a wireless network and plugged into a copper cable at the same time) it might pick either one. You can force it to pick one by disconnecting the other. Once VMWare is up and connected, the other can be plugged back in and VMWare will ignore it.
A better approach is to use the virtual network editor and assign one VMnet to a particular physical adapter, and another VMnet to another physical adapter. Then, in the device list for each VM, add a second network and assign each virtual network adapter to a particular physical adapter. That way your VM can – like your host OS – see both adapters at the same time, and it doesn’t matter if one is unplugged – it won’t “lose” it. This dual network solution is NOT available with the free VM Player – you must have workstation or one of the other paid licensed versions to use it.
Shared Folders
- Shared folders are an easy way to get to files on a host drive from inside VM. I always partition my laptop into a C: with OS & applications and an H: with data, so I create a shared folder to my entire host H: and map it to the H: in my VMs – that way the path to data files on H: is the same on my host and in my VMs. If you use only a C: drive, the easiest approach is to share it with the VM. But for more security you can share only the folders you want it to be able to access.
- Mapping a shared folder to D: in the VM is undesirable because the virtual CD drive assignment sometimes reverts back from some other letter to D: … then bad things happen!
- I use shared folders to keep as many data and installation files as possible on my host drives instead of the virtual drive. This keeps the virtual drive size small and reduces the risk of data loss should a virtual drive get corrupted (rare, but I’ve seen it happen). To aid in this, I typically go into regedit in my VM and point folders such as Personal (my documents) to my document folder on the H: drive.
Maximize Your Efficiency by Reusing VMs with Minimized Sizes
When backing up a VM, take steps to minimize its size and then zip the resulting image files. This will drastically reduce backup storage space requirements and transfer times.
Contact the Author
If you have any comments or questions about the material, please do not hesitate to contact me through the comment section. I would love to hear your answers to the questions as well.