100% Employee Owned, Founded 1954

Meinecke Meter Sample Calibration Report

Meinecke Resource

Meinecke Meter Sample Calibration Report 1

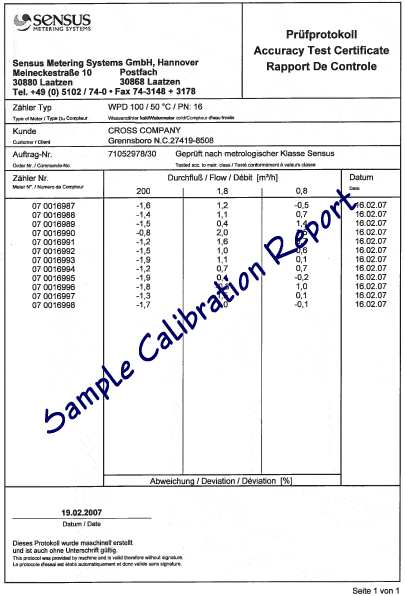
Meinecke’s factory calibration certificates can be a bit difficult to decipher the first time you see one, so we have provided the sample certificate along with a brief explanation below of the typical data found on these certificates.  

They are written in 3 languages, English is usually the 2nd one listed. The meters are tested in the factory’s calibration shop under real conditions. We’ll translate the first few lines.

They are written in 3 languages, English is usually the 2nd one listed. The meters are tested in the factory’s calibration shop under real conditions. We’ll translate the first few lines.

  1. Type: WPD 100 = 10mm or 4 inch WP/Dynamic Flow meter
  2. For: 50’c and PN:16 = Rated to 122’F and Pressure Rated to 16 Bar
  3. Order No. – This is the Sales Order we as a Master Distributor purchased these meters on.
  4. Meter No = Serial Number, Flow = Rate in M3/Hr, Date Tested: 16.02.07 = February 16, 2007

In the main body, you’ll see all the Serial Numbers of meters tested in that group in the first column. Meters are gang tested so you may see more than one meter listed on your report.

Meinecke tests these meters at three different relevant flow rates. For your 3” meter, test flow rates are shown below along with the deviation from that rate by %..
Meinecke Meter Sample Calibration Report 2

The next 3 columns show the deviation by % from the standard reading, at three distinct flow rates.

  • 200 m3/h (660.57 GPM) /    -1.0% deviation
  • 1.8 m3/h (7.92 GPM)     /    +1.2% deviation
  • 0.8 m3/h (3.52 GPM)     /     -0.5% deviation

The deviations listed are from the first meter listed…  Serial Number: 07 0016987

Are you interesting in learning more? Fill out our contact form with some details of your application and we’ll have a specialist get in touch! Also, learn more about Meinecke as a products and solutions provider for Cross.

Latest Cross Company Updates

CMS Cepcor, a leading supplier of aftermarket crusher spares and equipment to global industries, enhanced its quality control with the acquisition of an Altera M coordinate measuring machine.
April 29, 2025
parker transair in action
Parker’s Transair system is an industry leader when it comes to efficient, reliable, and clean piping for compressed air and industrial transfer applications.
April 29, 2025
Our own Jim Hewson, quality director for the Cross Precision Measurement group joins Chuck & Howie from the NAPT Podcast.
April 28, 2025
Cross Logo
Omron Logo
Flow Waterjet, a leader in industrial shape cutting, sought to enhance their machines to meet rising demands for precision and flexibility. Partnering with OMRON Automation, they integrated advanced motion control and safety systems, resulting in machines with unprecedented precision and efficiency.
April 25, 2025
Cross Logo
Brooks Instrument Case study: Using BEST Software to Prevent Process Failures
April 15, 2025

Contact our Team

Hang Tight! We're Searching... Searching... Searching...

We’re looking through thousands of pages to find the most relevant information.

In the meantime, enjoy these fun facts…

Did you know… Cross Company is an ESOP (Employee Stock Ownership Plan). Our ESOP started in 1979 and as of 2006, we are 100% employee-owned! Learn more about our ESOP and how that benefits both team members and our customers.
Did you know... the precision measurement group at Cross was founded in 1939 by our current CEO's grandfather, Jim King. That's a whole lot of calibration!
Did you know... A fingerprint weighs about 50 micrograms. We know, we weighed it! The residue left from a finger can actually make a difference in weight results which is why we wear gloves when we calibrate weights. For reference, a sheet of paper is about 4.5 grams, that’s 4.5 million micrograms.
Did you know… Cross Company has grown significantly since our start in 1954. Over the years we've acquired 26 companies! Today, our five groups have expertise in everything from industrial automation to precision measurement, and industry knowledge going all the way back to 1939.