Chris Hardy | December 29th, 2014
In the previous post we covered the basics of how gas/oil burners work. By what procedures should we tune them? There are three aspects to tuning a gas/oil burner CCS:
- Setting the FAR curve.
- Setting curves for output devices.
- Tuning PID loops.
Don’t Shortcut Safety!
We controls people are able to defeat BMS interlocks to run a burner when the BMS would not otherwise let it run. But do NOT do this.
Fix the problem. Calibrate or replace the part. Don’t get in a hurry. Don’t shorten purge timers. Push back against anyone who prioritizes schedule over safety.
Most boiler explosions happen when people who know what they are doing get in a hurry and bypass safety equipment.
***This is a serious, life and death issue.***
Prerequisites
Before starting to tune a gas/oil CCS:
- Make sure the instrumentation and outputs are calibrated and working properly. The accuracy of the O2 sensor is critical – if it is out of calibration, the FAR curve and almost everything to do with air will be wrong.
- The BMS and its instrumentation needs to be in good working order, able to light off.
- If possible, the CCS Human Machine Interface (HMI) should have a screen listing all the parameters you will be recording in order. This will help with recording consistency and save time hunting for all your variables. A nice additional feature here is to display smoothed values, run through a longer filter than you would use for control or normal displays.
- If you will be recording any values from gauges which do not run to the CCS, identify their locations, tag names, and ranges before beginning.
- Ideally the HMI will also have a trending package you can use to help tune loops and to go back and verify suspicious or outlying recorded data.
- I recommend tuning the drum level control first, and tweak it as you go if necessary, so that you can focus on combustion tuning without tripping the unit on drum level.
- Be prepared to produce a lot of steam, and to possibly trip a boiler at high load. If your plant is already in use, the ideal situation is for two boilers to be running in automatic, and for the facility to be consuming at least 20-40% more steam than the boiler you will be tuning can produce. If it is not consuming that much, be prepared to open a sky valve or to have another method to waste steam. Tuning a boiler without running it all the way to its maximum is not a good plan. As the boiler runs from minimum to maximum, the other two boilers will automatically back off. If you trip the boiler you are tuning, it’s easier for two other boilers to quickly take the lost load than just one, which might also trip on such a rapidly changing demand.
Setting Piecewise Characterizations
Setting PWC pairs is a significant portion of tuning a gas/oil CCS. The general idea is to run the boiler from minimum to maximum load, recording all the key parameters, including anything related to the input or the output of these PWC blocks. Once that data has been collected, it can be plugged into the PWC table.
Tips on plugging recorded data into PWC tables:
- After changing load, WAIT a few minutes to allow the system to stabilize at the new level!
- Values jump around (especially air flow) and you want to record the average value for the steady state condition. If you have a system with heavily smoothed values on a special tuning screen, you can just run down the list and write down the numbers. Otherwise, watch each value for a moment, or look at it in a trend to get a sense of the average value it is jumping around, and write that down.
- PWCs should start with a pair at (0,0), and end with a pair at or above (100%,100%). For example, the furnace may need more than 100% nominal air flow depending on conditions, so if the 100% load nominal air flow is 70 k#/H, the last X on your curve should extend to perhaps 90 k#/H. Output device curves should end at (100%,100%), not above.
- You should have a look at your curve before plugging it into a PWC. Put the values in a spreadsheet and produce a chart (in Excel you want “XY scatter”). You will probably notice that your line is a bit “bumpy” – you should adjust your curve numbers to smooth out these bumps, and enter those numbers into the PWC. This will also help you pick reasonable values that are beyond the maximum the boiler could be run at the time of tuning.
Overcoming Hysteresis
Some actuators – particularly air dampers – have a lot of hysteresis: they produce a very different flow when the command is raised to a position than when the command is lowered to the same position. This can make it difficult to make the fine adjustments required to get the O2 close to its SP.
To overcome this, make small adjustments by raising the command by around 10% for a second or two, then bring it back down to the new position. It will take a bit longer to settle out, but that may enable you to get closer to your SP.
You may also want to quantify the hysteresis – for the air damper this is easiest to do with the burner off: run the damper from minimum to maximum in small increments, recording the damper position command and resulting air flow. Then run it back down to minimum on the same increments and record them again. The difference in flow at each position tells you the amount of hysteresis.
Setting The Fuel / Air Ratio Curve
MAKE SURE that the O2 trim SP bias is zero before setting this curve! If it is off, and you adjust the air to achieve a biased O2 curve, your FAR will be wrong and you will have to re-do this procedure! With the air damper and fuel valve in manual, close the fuel valve as far as it can be closed and still maintain a good flame. Adjust the air damper so that the O2 is close to the O2 trim SP for that load. “Load” is the % boiler master, which will be tracking the % fuel flow.
(0%, 0%) will be your lowest PWC point for the FAR curve in the air PV logic. The minimum load point will be the 2nd point. The X for each FAR PWC point will be the air flow in mass flow units, and the Y for each point will be the fuel flow %.
Raise the load in small increments. Open the air damper first, then open the fuel valve so that the fuel flow % increases by 5%-10% increments. At each load increment, adjust the air damper until the O2 is close to its SP for that load, then record all the parameters.
Continue raising the load until you reach a limiting factor. This may be the 100% rated steam flow, but often instead, you may hit some other limit first – running out of air, Boiler Feedwater (BFW), too high temperature somewhere, etc. Sometimes you reach a point of diminishing return – if the steam flow has been increasing by 5% every time you open the fuel valve 3-4% all along, but it takes 6% fuel valve increase just to get the steam flow from 95% to 97%, you are done! Pushing to reach 100% will most likely result in a tripped unit, and you don’t want to run that boiler in such an inefficient regime anyway – operators should know to light another boiler if that one gets up that high. Capture your maximum point.
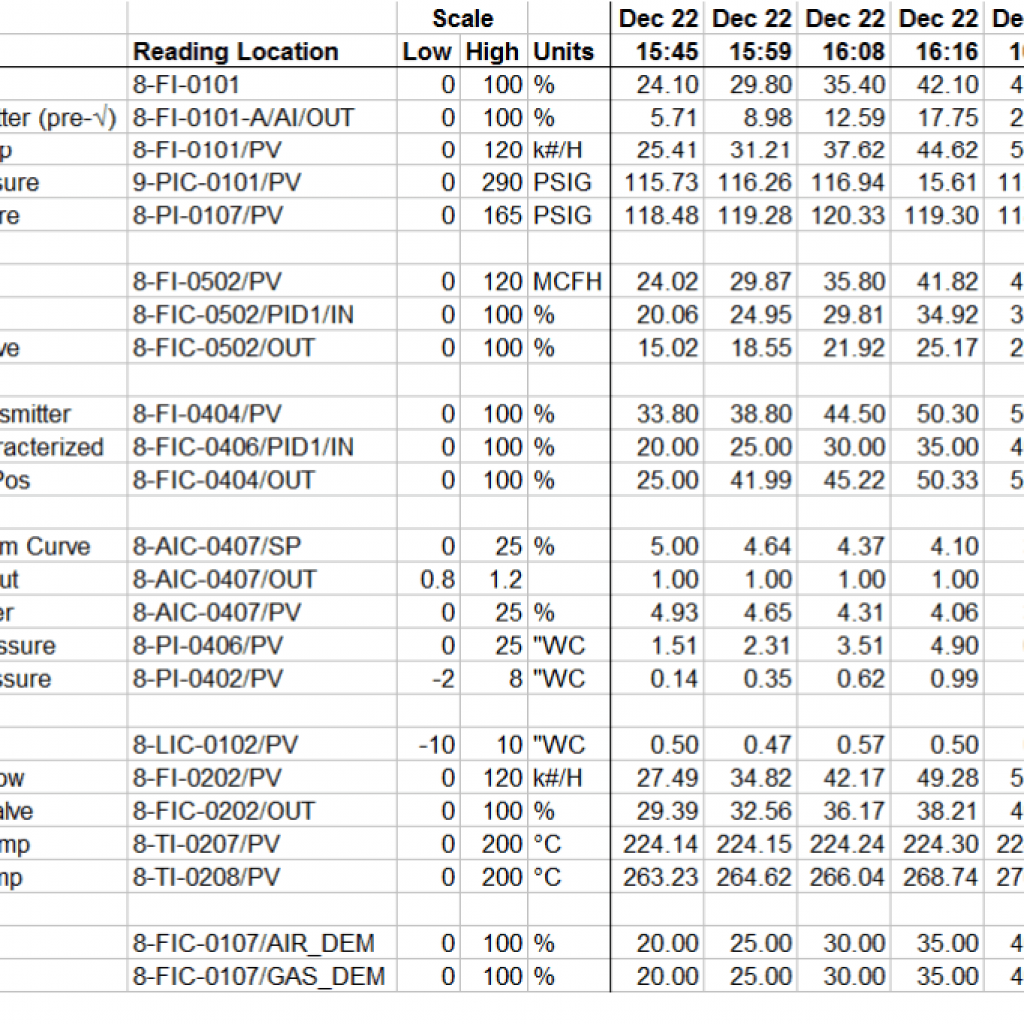
Plug your points into a spreadsheet and smooth your PWC points as described above. While the boiler is still in manual at maximum load, update the FAR PWC. When this is complete, your O2 trim output should be tracking very close to centered. If it is tracking at one of the limits, something is not right – figure out what it is before you put the air in auto, or you might trip the unit.
Once the FAR PWC is updated and appears to be working correctly, put the air flow, fuel flow, and O2 trim in cascade. It should remain settled, with the O2 trim output close to center. Record all the data again as you run the boiler back from maximum to minimum – this time by adjusting the boiler master output down. This is also a good time to focus on tuning PID loops. The O2 normally rises a bit above set-point after each transition, but again, it should settle out with the O2 close to SP and the O2 trim output close to center. If each point looks good on the way down, the curve is good.
Finally, set the maximum limit on the boiler master. You should have gotten a sense of the load, above which it was not advisable to rise. Set the limit there. However, if the limit has an associated raise-inhibit and might be different under different environmental conditions, you may want to leave the limit higher than what worked well today.
Burners without O2 Trim
The procedure above is standard for burners which supply all the heat for small boilers. Auxiliary or startup burners often supply only a small fraction of the heat to larger furnaces with other sources of combustion air, and so have only a small effect on that furnace’s exhaust O2. Such burners typically lack O2 Trim. Tuning the combustion air is more subjective – you follow a similar procedure as above, except instead of adjusting air to reach a target O2reading, a burner expert observes the flame and at each load point, calls for more or less air until the flame looks good. The system should still crosslimit and have all the standard CCS features other than O2 Trim.
Setting Curves for Output Devices
Burner CCSs typically have modulating output devices such as the boiler feedwater (BFW) valve, the Forced Draft (FD) air damper, and the fuel valve(s). Larger systems may also have many other outputs such as continuous blowdown valves, stack dampers, sky vent valves, etc…
These devices are often not linear, meaning a position change when mostly closed may result in a very different change in resulting flow than a similar position change when mostly open. This often results in a challenge to PID loop tuning – the loop is either responsive low but sluggish at higher outputs, or responsive at higher but unstable at lower outputs. There are at least four ways to deal with this, and a different solution may be chosen for each output in a system:
- Keep it simple! Tune the loop properly for the most responsive area and let it be sluggish for the rest. For outputs that are nearly linear, this is a good solution.
- Non-linear cams. This is an elegant mechanical solution in which the actuator moves the valve or damper different amounts for the same change in signal so that the motion is non-linear but the response of the fluid flow is nearly linear. These are nice, but probably not worth retrofitting if not originally installed.
- Output characterization. Add a PWC to the CCS between the output of the PID loop and the Analog Output (AO). While running the unit up on load, record the AO and the resulting PV indicating the flow through the device. Then, before tuning any related loops, adjust the PWC settings. Use the % device flow as the PWC X, and the corresponding device position as the Y.
- Adaptive Gain Control. If your CCS’s PID block has a gain modifier setting, you can tune it for one regime, and program that modifier to make it more or less responsive in other regimes to compensate for device non-linearity. For an air damper, I might configure the modifier to ( 1 + 4 * OUT ). That would make the loop 5 times more responsive with an open damper than when it is closed. I prefer this over characterizing outputs because there is no confusion between the PID output % and the device position command %, and it simplifies the program. For more details, see “Non-Linearity, Characterization, and Adaptive Gain Control” in my Advanced PID Loop Tuning blog.
Modulating outputs to motor speed references tend not to suffer as badly from non-linearity as valves or dampers.
If there are output curves to set, set those curves BEFORE attempting to tune any related PID loops.
Tuning PID Loops
Tuning the PID loops in a CCS is just like tuning loops in any other process control system. Please see my basic and advanced loop tuning blog posts.
Next, we’ll cover some Advanced or Unconventional Methods for Tuning a Combustion Control System.

