This is part 3 of a 4 part conversation on GPI’s “09” Series Electronic Display. The most recent upgrade to GPI’s “09” Series Display introduced a number of new features. Most of which you can enable/disable to meet your specific needs. By disabling “unnecessary” features, day to day meter operations can be greatly simplified, making the unit much easier to use. For more advanced users, it may be desirable to enable ALL possible features.
User-configurable features include:
- Totalizers/Modes Enabled (Cumulative Total, Batch 2 Total, Flow-Rate Mode)
- Flow-Rate Time-Base (Units per Minutes, Hours and Days)
- Factory Calibration Curve Units Enabled (Gallons, Imperial Gallons, Liters, Quarts, Ounces, Cubic Feet, Cubic Centimeters, Cubic Meters or Barrels (42 gal.)
- Dispense/Display or K-Factor Entry Calibration
Referencing the last bullet point above, GPI’s “09” Flow Computers are programmed with three different calibration methods, but only one of them, that being the correction factor method is readily available out of the box. The other two, “Dispense/Display and “K-Factor Entry” are still available but must be field configured to be accessed.
Changing Configuration Settings
Access to the configuration process is restricted for security until a “password” is entered. Configurations are entered and stored as six-digit “codes” where each digit represents a setting for one of the configuration options. New configuration settings are stored in the computer’s long-term memory and will not be lost either in OFF mode or during a battery change.
To change configuration settings, follow these instructions exactly! The process will require you to temporarily disconnect the power. For most configurations, this is as simple as removing the batteries.
- Temporarily disconnect power to the flow computer. On units with two batteries, only one needs to be disconnected. On remote units or others that are externally powered, temporarily disconnect power at any convenient point.
- Allow at least 30 seconds before proceeding to allow all internal capacitance to discharge.
- While the unit is still unpowered, press and hold both buttons. While holding both buttons, re-apply power. Keep both buttons pressed for about one second after applying power, and then release them.
- If you have done this correctly, the display should immediately show 000000 with the left-hand digit blinking. If you do not see this, go back to step (a) and try again.
- The computer is waiting for you to enter a valid password (actually a pass-number). The password for all 09 computers is 020748. To enter the number, use the CALIBRATE button to change the blinking digit and/or use the DISPLAY button to shift the blink to the next digit.
NOTE: As an added security precaution, if a valid password is NOT sensed within 90 seconds, the computer will revert to normal operation, and you will have to repeat the process starting from step 1 above. - When the correct password is displayed, briefly press and release BOTH buttons. If you have entered a valid password, the computer will immediately enter its field configuration mode, with the display showing the current six-digit configuration code (for example, 922948).
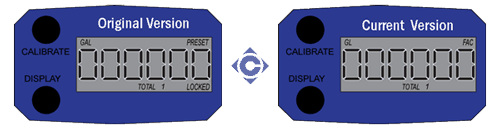
NOTE: As was the case in step 5 above, while in the Configuration Mode if a valid password is NOT sensed within 90 seconds, the computer will revert to normal operation. If this happens, and you have not completed the process, you will have to repeat the entire process starting from step 2 above. - At this point, you’ll need a configuration code to continue the process of customizing your 09 display. GPI provides a Code Configurator to build this code and there are two configurators available. One for GPI original 09 Display and a second for the current version. Both are pictured below, Compare the face of your display to the images show below and click the correct one to build your code.
- Using the same methods as you used in step (e) above, enter the six-digit code number for your new configuration.
- When the correct six-digit code appears, briefly press and release BOTH buttons. The display will briefly show CFGEnd, and then the unit will return to normal operation. The configuration is complete. Your new settings are stored in the computer’s long-term memory and will NOT be lost either in sleep mode or during a battery change. However, if you are not satisfied with the new settings, you can repeat the configuration process and change any setting as often as desired. Often only a single digit of the six-digit code will need to be changed.